


|
Table of Contents
|
Postural Examination1
Posture should be examined in standing, with special attention paid to the joints above and below the knee. Examine the patient from the front, back and both sides. Look for any asymmetry in posture or muscle tone, any bruising, swelling, redness, scaring or open wounds on the patient. In general ideal posture should consist of
- Head is erect in a neutral position
- Shoulders should be level, scapula should lie flat against the back about four inches apart in adults
- Arms hang relaxed, elbows slightly bent and palms face the body
- Hips should be level and even from all directions
- Toes should extend straight in a forward line with the foot. The longitudinal arch of the foot should be in the shape of a half-dome.
The legs should be straight from all viewpoints with the kneecaps facing straight ahead. Some common postural deformities of the knees are
- Genu varus – knock-knees
- Genu valgus – bowlegs
- Genu recurvatum – knee curves backwards
- Owl eye patella – patellas rotated medially
- Frog eye patella – patellas rotated laterally
Gait Evaluation 2
There are two phases of gait, stance and swing phase. These phases are subdivided into eight subphases; initial contact, loading response, midstance, terminal stance, preswing, initial swing, midswing and terminal swing. Clinicians should be familiar with the details of these phases. Gait observation should take place from all angles; anterior, posterior and lateral. Observation should begin proximal to distal, including the trunk, upper and lower limbs. Ideally gait observation should begin without notifying the patient as to try to capture their most natural gait. Observations of gait should include
- Anterior - lateral tilt of pelvis, sideways swaying of trunk, pelvic rotation in the horizontal plane, trunk and upper extremity rotation opposite to the pelvis and reciprocal arm swing, hip, knee, ankle and subtalar joint motion
- Lateral - rotation of the shoulder and thorax, reciprocal arm swing, spinal posture, pelvic rotation, flexion-extension of the hip, flexion-extension of the knee, dorsiflexion-plantarflexion of the ankle, step length, stride length, cadence
- Posterior - lateral tilt of pelvis, sideways swaying of trunk, pelvic rotation in the horizontal plane, trunk and upper extremity rotation opposite to the pelvis and reciprocal arm swing, hip, knee, ankle and subtalar joint motion, heel rise, width of base of support, calcaneal rotation, lateral movement of back musculature, spine, buttocks, thigh and calf
Specific deviations of the knee include
| Deviation | Likely Cause | Potential Pathology |
|---|---|---|
| Rapid extension of knee after initial contact | Spasticity of quadriceps | Upper motor neuron lesion |
| Lack of knee flexion during loading response | Weak quadriceps, knee pain | Femoral nerve neuropathy,arthritis |
| Genu recurvatum during stance | Knee extensor weakness | Poliomyelitis, neuropathy |
| Genu recurvatum in initial contact and pre swing | Pes equinus, ankle plantar flexor spasticity | Upper motor neuron lesion, congenital defect |
| Varus during stance | Lateral and posterior ligamentous joint structure laxity | Trauma |
| Flexion during stance | Knee flexion contracture, hamstring spasticity, knee pain and joint effusion, plantar flexor weakness, hip flexion contracture | Trauma, arthritis, upper motor lesion |
| Lack of extension in terminal swing | Knee flexion contracture, hamstring spasticity, knee pain and joint effusion | Trauma, arthritis, upper motor lesion |
| Lack of flexion during swing | Knee extension contracture, spasticity of knee extensors | Surgical fusion, immobilization, upper motor neuron lesion, ankle dorsiflexor weakness |
| Excessive flexion during swing | Short stance leg, lack of ankle dorsiflexion on swing leg | Ankle dorsiflexion weakness, hip deformity, congenital defect |
Quick Tests 3
Quick tests of the knee include squatting, single leg stance and single leg hop. Be sure to note the quality of movement, ranges of motion and any comparative sign.
Squat
Have the patient perform a squat as deep as is comfortable. If the patient is able to do this without pain, have the patient repeat this motion with the heels raised.
Single Leg Stance, Squat, hop
The patient should stand on the affected leg. If the patient can do this without pain, they should try squatting on this leg. If this does not provoke pain the patient should then perform a small hop.
Palpation4
Begin your gross assessment of the knee by comparing both legs bilaterally from the front, back, lateral and medial sides. While palpating observe your patient’s behavior; look for any grimaces or appearance of apprehension. When observing the knees, look for any asymmetry, swelling, bruising, redness or any visible injuries. When palpating feel for changes in temperature, tenderness or any other anomalies (i.e. lumps, graininess, tightness, etc.). Be sure to note any of these conditions or if with palpation you are able to produce a comparable sign.


(Image from http://sitemaker.umich.edu/fm_gmeig_musculoskeletal_joint-inject-aspir/files/medialkneelabeled.jpg)
(Image from http://sitemaker.umich.edu/fm_gmeig_musculoskeletal_joint-inject-aspir/files/lateralkneelabeled.jpg)
Bony Structures

Begin palpation of the knee by finding the femur with the patient’s leg in extension. As you palpate inferiorly, the first prominence you feel will be the femoral epicondyle.
Continue to move inferior and flex the knee to 90°. If you palpate medially, the next prominence you feel will be the femoral condyle. With the knee in this position you can also palpate the joint line. Joint line tenderness can be an indication of meniscal injury.
Inferior to the femur in the joint line are the tibial condyles. If you move your hands more laterally and inferiorly you will find the tibial epicondyles.
Move your lateral hand posteriolaterally from the tibial epicondyles to find the head of the fibula. This palpation may be sensitive to the patient. This is an attachment cite for biceps femoris, soleus , fibularis longus, and the lateral collateral ligament. Tenderness here could indicate injury to one of these structures.
Place the patient’s leg in extension. Move medially to the midline of the tibia. The tibial tubercle will be a bony prominence here. To verify that you are on the tubercle, have the patient contract their quadriceps. If your fingers do not move, you are on the tibial tubercle. This is the attachment site for the quadriceps. Tenderness here could indicate a quadriceps injury.
(Image from http://www.consumersresearchcncl.org/Healthcare/Orthopedists/images/250px-Knee_diagram.png)
Ligaments
Lateral Collateral Ligament - Have the patient in short sit with the leg on the affected side in a figure four position. Palpate laterally to the knee to feel for a pencil like structure. The lateral collateral ligament runs from the lateral femoral epicondyle to the head of the fibula. The LCL should feel tight underneath your fingers. Pain with palpation may be indicative of an injury.
Medial Collateral Ligament -The medial collateral ligament runs from the medial femoral epicondyle to superior medial surface of the tibia. This ligament is a wide fan shaped structure that can be palpated by finding the two prior landmarks. Pain with palpation may be indicative of an injury.
Patellar Tendon/Ligament -Superior to the tibial tuberosity is the patellar ligament that connects the quadriceps muscle to the tibial tuberosity. In long sitting, have your patient contract their quadriceps and palpate this prominence. Follow the ligament superiorly above the patella and you will find the patellar tendon, which connects the quadriceps to the patella. Tenderness at either of these places could be indicative of injury.
Soft Tissue
Quadriceps - The vastus lateralis can be palpated approximately 2-3 finger widths above the patellar pole laterally. The vastus medialis can be felt 2-3 finger widths above the patellar pole medially. The rectus femoris is central to the vasti and is superior to the vastus intermedius.
Semimembranosus - The semimebranosus attaches on the medial tibial condyle.
Pes Anserine - The Pes Anserine can be palpated on the superior posterior medial aspect of the tibia. This point is the common insertion for the sartorius, gracilis and semitendinosus.
Gastrocnemius - The Gastrocenmius crosses the knee and can cause knee flexion. It’s medial and lateral heads attach on the posterior aspect of the femoral medial and lateral epicondyles respectively.
Illiotibial band - The patient is in long sitting with the knee being examined flexed to 90°. Palpate laterally, starting superior to knee to feel a tight band of tissue. This is the Illiotibia (IT) band. Follow this structure inferiorly to the superior lateral aspect of the tibia. This is Gerdy’s Tubercle where the IT band inserts.

(Image from http://runwithsneakers.com/wp-content/uploads/2011/07/knee.jpg)
Clearing Joints2
Ankle Clearing
To clear the ankle the patient is placed in the prone position with the therapist standing beside the patient’s affected side. The knee is flexed to 90° with the ankle relaxed. The physical therapist grasp the foot at the ankle for support and at the mid –foot. The hand on the mid-foot repeatedly moves the foot into dorsiflexion and plantar flexion. After a few movements the therapist applies a quick flick into dorsiflexion, followed by more repeated movements. Next the therapist applies a quick flick into plantar flexion, followed by more repeated movements. Finally the therapist places a quick flick into inversion. If the patent does not report any reproduction of their pain with these movements, the ankle is cleared.
Hip Clearing
To clear the hip the patient lies in supine, with the hip and knee flexed to 90°. The physical therapist most lateral hand is placed on the patient’s ASIS, the medial hand is placed on the back side of the knee to control the hip movement. Flex the patient’s hip to feel end range of motion, if there is no pain, apply overpressure. Bringing the patient’s knee close to your body, rotate the lower leg into internal rotation and then external rotation. If pain is not aggravated, apply over pressure in these positions. Next take the hip into end range flexion and adduction, moving the knee in a diagonal line towards the opposite shoulder. Apply overpressure in this position if there is no pain. If pain is not provoked, add medial rotation to this position. If a comparable sign is still not elicited, apply compression in the inferior direction through the knee. If no symptoms are provoked with any of these positions the hip can be considered cleared. Video instruction can be found here.
Passive Range of Motion
Knee Extension
Patient Position:Supine in anatomical position
Test Procedure: Patient’s heel is grasped in one hand by the examiner and overpressure is applied to the anterior tibia at the level of the tibial tuberosity.
Test Results: Normal range of motion is 0 degrees to 15 degrees of hyperextension. Any loss of range of motion or discrepancies between the right and left side should be noted and followed up with goniometry. Normal end feel should be firm due to tissue stretch.
Knee Flexion
Patient Position: Supine in anatomical position
Test Procedure: The examiner flexes the patient’s hip and knee.
Test Results: Normal range of motion is 135° of flexion. Any loss of range of motion or discrepancies between the right and left side should be noted and followed up with goniometry. A normal end feel is soft due to tissue approximation.
Muscle Power Evaluation
Patient Position: Supine with the patient’s knee flexed over the examiner’s knee
Test Procedure:
Knee Extensors: Patient is asked to maintain their position without letting the examiner move them. The examiner applies resistance to the anterior tibia.
Knee Flexors: Patient is asked to maintain their position without letting the examiner move them. The examiner applies resistance to the posterior tibia.
Test Results: Any weakness or discrepancy between right and left sides can be indicative of a muscle weakness and should be followed up with manual muscle testing procedures.
Neurological Examination2
Dermatomes
To test the dermatomes of the knee, use a pointed object, such as the end of a paperclip to trace the end of the dermatome. Start with the unaffected side, then the unaffected side. Ask the patient if they notice any difference in sensation between the two sides. A difference in sensation may be indicative of neural involvement. Dermatomes of the knee include
- L3 – medial knee
- L4 - anterior middle aspect of knee
- L5 - lateral knee
- S1 - posteriolateral aspect of knee
- S2 - posteriomedial aspect of knee
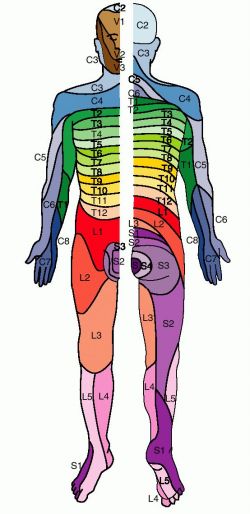
(Image from http://img.tfd.com/dorland/thumbs/dermatome.jpg)
Neural Tension Tests
Prone Knee Bend
This test is used if neurological symptoms are present in the anterior thigh. The patient should lie prone while the examiner moves effected leg to 90° of flexion at the knee. The test is positive if the comparable sign is elicited.
Video demonstration can be found here.
Straight Leg Raise
This test is used if neurological symptoms are present past the gluteal fold. Once neurological symptoms are produced, the test should be discontinued. The patient should lie supine while the examiner raises the effected leg into 90° of hip flexion with the knee if full extension. If no comparable sign is elicted, the ankle is then dorsiflexed. If this does not provoke a comparable sign, the patient should flex their neck, bringing their chin to their chest. When a comparable sign is found, confirm your findings by releasing the distal component. If this alleviates the neurological symptoms, the test is positive.
Special Tests
Ligamentous Integrity
For the following tests, the patient should be relaxed for testing of the unaffected side followed by the affected side. The examiner should apply their force gently and increase gradually until an end feel is established or to the point of pain. A normal ligamentous end feel should be an abrupt stop. A soft or indistinct end feel is indicative of an injury.
Varus Stress Test 2
Structure Tested: LCL
Patient Position: Supine with the knee flexed to 30° and the tibia in neutral. 5
Test Procedure: The examiner supports the limb with one hand and applies a varus force to the knee with the other hand. The test is repeated in extension.
Test Results: A positive test is indicated when there is excessive gapping at the lateral tibiofemoral joint and/or the patient complains of pain. Gapping in full extension is considered a major disruption of the knee.
Valgus Stress Test 2
Structure Tested: MCL
Patient Position: Supine with the knee flexed to 30° and the tibia in neutral.5
Test Procedure: The examiner supports the patient’s leg with one hand and applies a valgus force to the knee with the other hand. The test is repeated in full extension.
Test Results: A positive test involves excessive gapping at the medial tibiofemoral joint and/or pain. Gapping in extension is considered a major disruption of the knee.
Apley Distraction Test2
Structure Tested: MCL & LCL
Patient Position: Prone with the knee flexed to 90°.
Test Procedure: The examiner anchors the patient’s thigh to the table and rotates the tibia internally and externally with distraction.
Test Results: A positive test is indicated by excessive or restricted movement and or pain.
Lachman's Test 2
Structure Tested: ACL
Patient Position: Supine with the knee in 30° of flexion and the tibia in neutral.
Test Procedure: The examiner stabilizes the femur with one hand and pulls the tibia anteriorly with the other.
Test Results: A positive sign is excessive anterior translation of the tibia, a soft or mushy end feel, or disappearance of the infrapatellar tendon slope. There may be pain associated with a partial tear, but not typically with a complete rupture.6
Anterior Drawer Test 2
Structure Tested: ACL
Patient Position: Supine with the knee flexed to 90° and the hip flexed to 45°.
Test Procedure: The examiner sits on the patient’s foot, grasps the tibia, and pulls the tibia forward.
Test Results: A positive test is indicated by excessive anterior translation.
Pivot-Shift Test 2
Structure Tested: ACL
Patient Position: Supine with the tibia internally rotated and the knee at 30°.6
Test Procedure: The examiner holds the patient’s heel with one hand in about 20 degrees of internal rotation. With the other hand, the examiner applies a valgus force to the knee. The knee is brought in and out of flexion several times.
Test Results: A positive test is indicated by the patient reporting a giving way. Feeling or the presence of a “clunk” .5
Reverse Pivot Shift Test2
Structure Tested: ACL & PCL
Patient Position: Supine with the hip flexed to 70-80°, the knee flexed, and the tibia externally rotated by the examiner.
Test Procedure: The examiner grasps the patient’s heel with one hand and externally rotates it while simultaneously flexing their hip and knee. With the other hand, the examiner applies a valgus force to the knee. The examiner then brings the patient’s knee in and out of extension several times.
Test Results: A positive test is indicated by the patient reporting a giving way. Feeling or the presence of a “clunk”.5
Sag Sign 5
Structure Tested: PCL
Patient Position: Supine with the hip flexed to 90° and the knee flexed to 90° with ankle supported by the examiner.
Test Procedure: The examiner observes the position of the tibia relative to the femur. The patient then activates the quad to see if the position changes.
Test Results: A positive test is indicated by loss of the medial tibial plateau protruding beyond the femoral condyle and no change in position with quad activation.
Posterior Drawer Test 6
Structure Tested: PCL
Patient Position: Supine with the knee flexed to 90° and the hip flexed to 45°.
Test Procedure: The examiner sits on the patient’s foot and applies a posterior force to the tibia while grasping it.
Test Results: A positive test is indicated by excessive posterior translation of the tibia on the femur.
Meniscus Integrity
For the following tests, the patient should be relaxed for testing of the unaffected side followed by the affected side. When appropriate, the examiner should apply their force gently and increase gradually until an end feel is established or to the point of pain.
McMurrys 2
Structure Tested: Meniscus
Patient Position: The patient lies in supine with the physical therapist standing on the side of the affected leg.
Test Procedure: The therapist places one hand at the knee the other at the calcaneus. The PT lifts the leg below the knee and palpates the joint line. Using the inferior hand the PT brings the knee from extension into 90° of flexion and medially rotates the tibia. This motion may be repeated a few times.
Test Results: This position stresses the lateral meniscus, a click is a positive test. To test the medial meniscus, the PT repeats the same motion but uses a lateral rotation.
Thessaly’s Test 2
Structure Tested: Meniscus
Patient Position: The patient stands on one leg with the knee slightly bent.
Test Procedure: The patient then twists side to side in single leg stance.
Test Results: Pain is a positive test.
Apley’s Grind Test 2
Structure Tested: Meniscus
Patient Position: The patient lies in prone with the PT on the affected side. The affected knee if flexed to 90°.
Test Procedure: The PT’s stabilizes the posterior knee with one hand. The other hand is placed on the calcaneus and applies compression while rotating medially and laterally. The PT should note any restriction, excessive movement or pain. Next, the PT should apply compression while rotating medially and laterally.
Test results: Pain with distraction is typically indicative of a ligamentous injury. Pain with compression is a positive test for meniscal injury.
Passive Accessory Examination7
This examination should be performed to passively reproduce the comparable sign. It should be done with the least amount of force necessary, which means the lowest grade should be used to reproduce the comparable sign. The examiner should feel for R1, R2, and pain if present. Techniques for passive accessory examination can also be used for as treatment techniques.
Anteroposterior: Used to enhance knee extension
With the patient lying in supine with the knee in 10-70°, the examiner places their thumbs on the patient's tibial tuberosity. The examiner wraps their hands around the patient's tibia and applies a force in the anteroposterior direction noting resistance and location of pain. The heel of the hand can be used instead of the thumbs for additional force.
Posteroanterior: Used to enhance knee flexion
With the patient lying in supine with the knee in a few degrees of flexion, the examiner grasps the posterior tibial plateau. A force is applied in a posteroanterior direction. Alternate positions include the patient lying in prone and the examiner using the palm of their hand to apply force.
References
1. Kendall, F. Muscles Testing and Function with Posture and Pain. 5th Edition ed. Baltimore, MD: Lippincott Williams & Wilkins; 2005.
2. Magee, D. Knee. In: Orthopedic physical assessment. 5th Edition ed. Saint Louis, MO: Saunders; 2008.
3. Banks, K. Maitland's Clinical Companion. ed. Edinburgh, U.K.: Churchill Livingstone Elsevier; 2010:562.
4. Drake, L. Gray's Anatomy For Students. 2nd Edition ed. Philadelphia, PA: Churchill Livingstone Elsevier; 2010:512.
5. Bennett, G. Principles of examining the knee. Fall 2012 Lectures. 2012;Week 5:7-11.
6. Craig J. Knee injuries. Fall 2012 Lectures. 2012;Week 5:6,7.
7. Banks K, Hengeveld E, eds. Maitland's peripheral manipulation. 4th Edition ed. London: Elsevier; 2005.


